


Why Shower Pan Installation Is the Foundation of a Leak-Free Bathroom
Shower pan installation is one of the most critical steps in any bathroom renovation - and getting it wrong can lead to expensive water damage, mold growth, and costly repairs down the road.
Essential Steps for Shower Pan Installation:
- Prepare the subfloor - Ensure it's level, clean, and structurally sound
- Install the drain assembly - Connect to existing plumbing with proper sealing
- Create the mortar bed - Build a sloped base for proper drainage
- Set and level the pan - Position carefully and check all directions
- Secure the pan - Attach to wall studs with appropriate fasteners
- Test for leaks - Perform flood test before final installation
- Install waterproofing - Add liner and seal all penetrations
The good news? Installing a shower base can seem like a daunting task, when in reality, it can be quite simple with the proper instructions. Modern shower pans made of acrylic or fiberglass are designed for easier DIY installation compared to traditional mud-set pans.
But here's what many homeowners don't realize: the shower pan is just one layer in a complex waterproofing system. A typical shower floor actually has five distinct layers - from the subfloor at the bottom to the finished tile on top. Each layer plays a crucial role in directing water toward the drain and preventing leaks.
The most common mistakes happen during subfloor preparation and drain connection. Getting these fundamentals right from the start will save you headaches (and wallet-aches) later.

Pre-Installation Prep: Tools, Materials, and Subfloor
Getting your shower pan installation off to the right start means doing your homework first. Think of this phase like meal prep - a little organization upfront saves you from scrambling around later when your hands are covered in mortar!
The truth is, most DIY shower projects that go sideways do so because someone skipped the prep work. Don't be that person.
Gathering Your Tools and Materials
Picture this: you're knee-deep in setting your shower pan, and you realize you're missing a crucial tool. Now you're making an emergency run to the hardware store with wet mortar waiting at home. Not fun.
Here's everything you'll need to get the job done right the first time:
Essential Tools: Your tape measure and level (grab both a 2-foot and 4-foot if possible) are your best friends here. You'll also need a drill with bits, a caulk gun, and a notched trowel sized according to your thin-set manufacturer's specs. Don't forget buckets for mixing and a jigsaw or circular saw for any cutting needs.
Materials List: Stock up on mortar mix (Type N or S works great, or go with modified thin-set per your pan maker's instructions), 100% silicone sealant, wooden shims, exterior-grade screws (1¼-inch is typically perfect), and washers for securing everything down. Your shower pan and complete drain assembly are obviously must-haves - double-check that brass kit has all its pieces before you start!
If your subfloor isn't perfectly level (and let's be honest, most aren't), grab some self-leveling compound and 1x2 lumber to create a dam. You'll also want a rubber drainpipe gasket, gasket setscrew, and drain screen.
Pro tip: Always check your specific shower pan manufacturer's instructions. Some brands have their own quirky requirements that could save you a headache later.
Preparing the Subfloor for Installation
Here's where the magic happens - or where things can go terribly wrong if you rush it. Your subfloor is literally the foundation of everything that comes next.
Start with a clean slate. Sweep, vacuum, and scrape away every bit of debris, dust, and old adhesive. That little blob of something you think won't matter? It will. Trust us.
Next, check that everything is rock solid. Walk around and feel for any squeaks or flex. If you're working with wood subflooring, make sure all nails and screws are countersunk flush. The ideal setup is ¾" tongue-and-groove plywood over joists spaced 16 inches on center, all glued and screwed down tight.
Level is everything in shower work. An unlevel subfloor leads to drainage problems, cracked pans, and expensive do-overs. Grab your longest level and check every direction. Find high or low spots? Self-leveling compound is your friend. Mix it according to the package directions, use that 1x2 lumber as a dam to keep it contained, and let it cure completely before moving on.
The final step is cutting your drain opening. Most installations need a 5-inch round hole, and your drain pipe (usually 2-inch ABS or PVC) should be cut precisely 1/8 inch higher than the subfloor. This slight elevation creates the perfect seal with your drain assembly. Clean off any burrs - they'll mess with your seal.
Getting these plumbing details right from the start is one of those Essential Plumbing Considerations for Home Remodeling that separate successful DIY projects from costly mistakes.
If you're feeling uncertain about your subfloor or plumbing setup, the experts at HRI Plumbing can help ensure your Bathroom Remodeling in Springfield, IL starts on solid ground.
The Core Steps of Shower Pan Installation
With your subfloor perfectly prepped, it's time for the exciting part: bringing your new shower pan into the picture! This stage involves careful test-fitting, precise leveling, and expert drain connection to ensure a watertight and functional shower.

Dry-Fitting and Drain Alignment
Think of dry-fitting like trying on clothes before you buy them - it's your chance to make sure everything fits perfectly before committing. Dry-fitting the shower pan is absolutely essential and can save you from major headaches later.
Start by carefully placing the shower pan in its intended spot. Take a pencil and mark the pan outline on your subfloor - this line becomes your roadmap for applying mortar later. Now comes the critical part: checking that drain alignment. The shower pan's drain hole needs to line up perfectly with your subfloor drain pipe. Even a small misalignment can cause big problems down the road.
While you have the pan in place, check for level in all directions. Use your 4-foot level to verify the pan sits evenly. If you notice any rocking or gaps, make note of where you'll need shims later. Don't forget about wall stud placement either - if your pan has flanges for securing to studs, now's the time to mark and pre-drill those 3/16-inch holes. This prevents cracking when you install the final screws.
Here's a pro tip: leave about 1/8 inch expansion gaps between the pan and wall studs. This small space allows the materials to expand and contract naturally without buckling or cracking your beautiful new shower base.
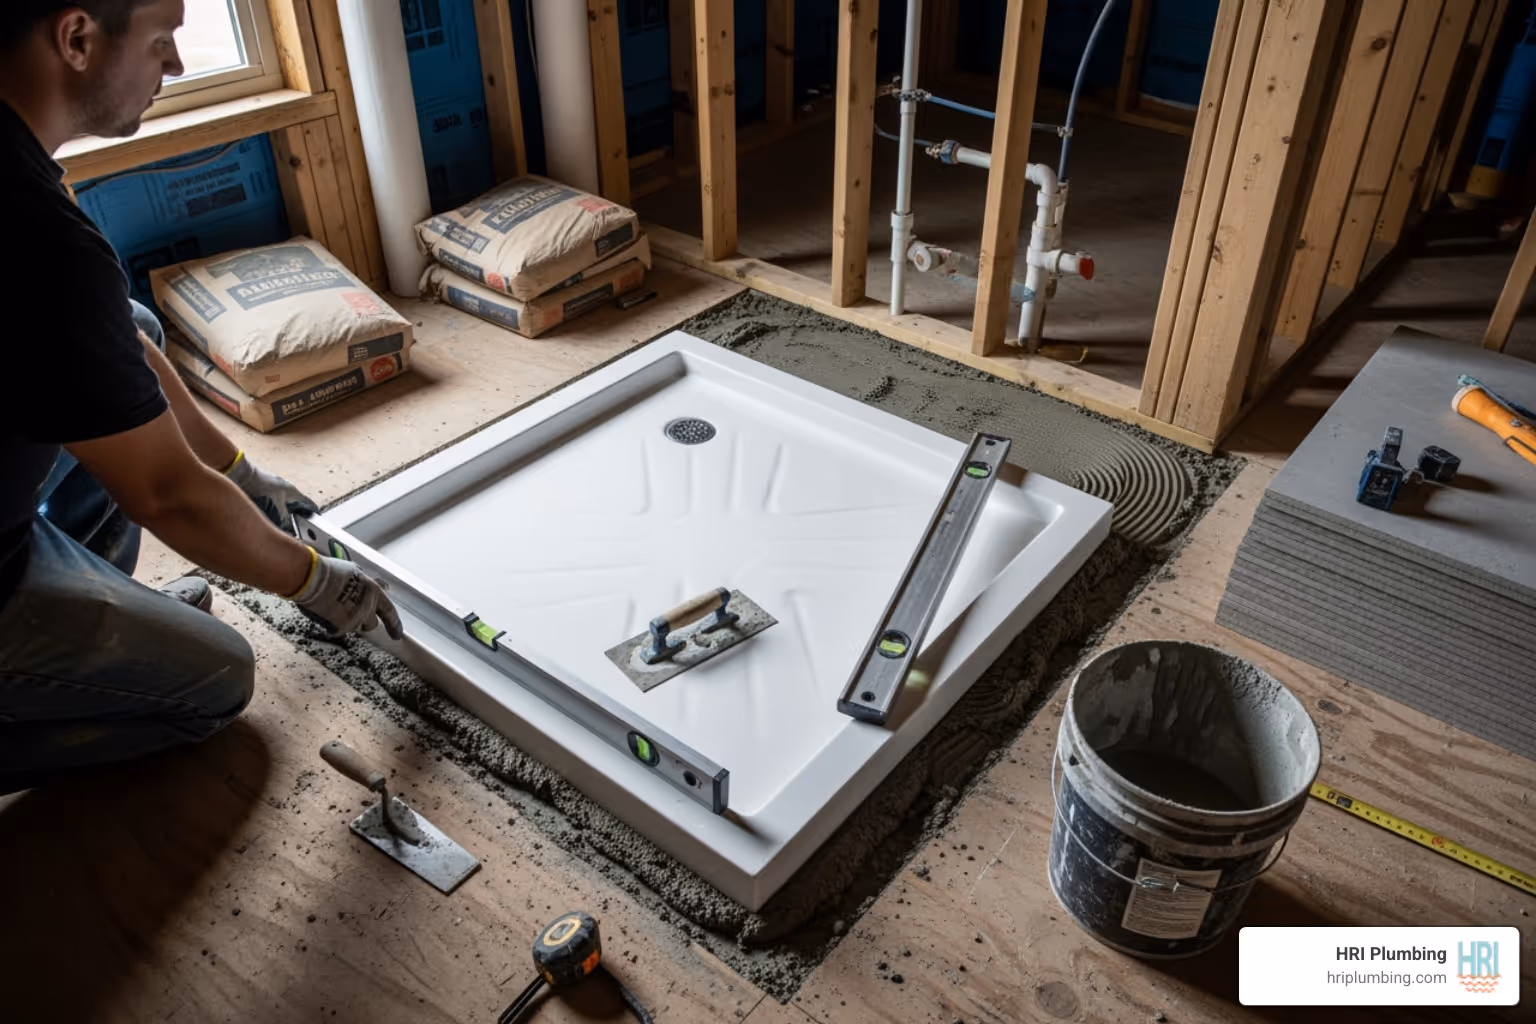
Setting the Pan and Ensuring Proper Drainage
Now for the moment of truth - permanently setting your shower pan installation. This step requires patience and attention to detail, but getting it right means years of trouble-free showers ahead.
Your mortar mix consistency is crucial here. Mix it to the texture of a thick milkshake - spreadable but firm enough to support the pan's weight. Whether you're using traditional deck mud or modified thin-set, the key is even application. Spread your mortar bed within those pencil lines you marked earlier, troweling toward the front or curb of the shower. This technique helps prevent air pockets that could cause problems later.
Time to set the pan! Lower it carefully onto the mortar bed and press firmly to ensure full contact. Some installers actually walk on the pan (with protective covering) to help it settle evenly. Now comes the most critical part: leveling in all directions. Check front-to-back, side-to-side, and corner-to-corner with your level.
Any checking for wobbles or uneven spots? Use wooden shims to make adjustments, but make sure the pan stays fully supported by the mortar underneath. Once everything's perfectly level, secure the pan rim to wall studs with your pre-drilled holes and exterior-grade screws with washers. Remember - snug but not over-tight!
If you're dealing with an existing shower that's not draining properly, improper leveling during the original installation is often the culprit. That's where professional Shower Repair Services can help diagnose and fix the issue.
A Guide to Shower Pan Drain Installation
The drain connection is where many DIYers feel intimidated, but it's really just about following a logical sequence and paying attention to detail. Think of it as the grand finale of your shower pan project.
You'll typically encounter two main drain types: compression drains (common in remodels) and solvent-weld drains (often used in new construction). Both rely on creating a watertight seal between the drain assembly and your shower pan.
Start by applying a continuous bead of the manufacturer-recommended sealant to the drain flange's underside. Most modern pans specify 100% silicone, but some require specific latex/acrylic caulks. Here's where many people make a costly mistake: plumber's putty vs. silicone isn't just a preference issue. Plumber's putty can actually degrade certain shower pan materials over time, so always stick with what the manufacturer recommends.
Insert the drain flange through the pan opening and press down firmly. From underneath, you'll typically install a rubber gasket, friction washer, and locking ring in that order. The locking ring needs to be tight enough to compress the gaskets but not so tight that you crack the pan - think "firm handshake" rather than "vice grip."
Tightening the drain assembly properly is crucial. Use the manufacturer's torque specifications if provided, or tighten until the gaskets are compressed but stop before you feel excessive resistance. Over-tightening is one of the most common causes of cracked shower pans.
Once everything's assembled, apply another bead of silicone between the drain flange and pan surface for extra protection. Now for the ultimate test: leak testing. Plug the drain, fill the pan with water, and let it sit for at least two hours. Check thoroughly around the drain connection and pan perimeter. No leaks? Congratulations - you've successfully completed the most critical part of your shower pan installation!
Waterproofing and Finishing Your Shower
Think your shower pan installation is done once the pan is in place? Not quite! The shower pan is actually just one piece of a sophisticated waterproofing puzzle. Getting the liner right and properly finishing the surrounding areas is what separates a shower that lasts decades from one that causes expensive headaches down the road.

The Critical Role of the Shower Pan Liner
Here's something that surprises many DIYers: the shower pan liner is often more important for long-term waterproofing than the visible shower pan itself. This flexible, waterproof membrane acts like an insurance policy, catching any water that sneaks through your tiles and grout.
Remember those five layers we talked about earlier? The pan liner sits right on top of your pre-sloped mortar bed, creating a watertight barrier that funnels water directly to the drain's weep holes. These tiny holes are your shower's secret weapon - they allow trapped water to escape rather than pooling where it can cause damage.
Most professional installers use PVC or CPE sheet material in either 30 mil or 40 mil thickness. The thicker material costs a bit more but provides extra peace of mind. When you're installing your liner, precision matters more than speed.
Start by extending the liner at least five inches up each wall above the curb height. This creates a waterproof "bathtub" that catches any moisture trying to escape. When securing the liner to your wall studs, here's a crucial tip: only staple the top half-inch of the material. Staples lower down can create leak paths.
Corner work requires special attention. You'll need to carefully fold and seal each corner using the appropriate adhesive for your liner material. Dam corners - those pre-formed pieces designed for wall-to-curb intersections - can save you time and provide a more reliable seal than trying to fold everything by hand.
Before you move forward, perform a flood test. Plug the drain, fill the shower area with water right up to the curb, and wait at least two hours. If the water level stays put, you've got a watertight system. If it drops, you've got some detective work to do. This step might feel tedious, but it's much easier to fix issues now than after your beautiful tile work is complete. To see how all these layers work together, you can see a cutaway of a traditional shower pan.
One important warning: never use felt paper under your pan liner. The petroleum in felt paper can react with the liner material, causing it to crack and fail over time. It's one of those old-school practices that sounds logical but can cause real problems.
Framing and Finishing Around Your New Shower Base
With your waterproofing system locked down, it's time to make everything look professional. This is where your shower transforms from a construction zone into a beautiful bathroom feature.
For custom walk-in showers, here's an insider tip: install your shower base before framing any return walls. This approach gives you better access and ensures perfect integration between the pan and surrounding structure.
Cement backer board becomes your best friend for the wall surfaces around your new shower pan. This moisture-resistant material provides the stable foundation your tiles need. Position the backer board so it extends down to just above the shower pan's flange, then install your wall tiles in front of it. This overlap ensures water naturally sheds down the wall and into the pan rather than finding gaps to exploit.
Secure your backer board with appropriate screws and washers, then seal every seam and screw hole. Use thin-set mortar with fiberglass mesh tape or a fluid-applied waterproofing membrane - whatever meets current Tile Council of North America standards. These details might seem small, but they're what separate amateur work from professional results.
The transition between your bathroom floor and shower base deserves special attention. Run your floor tiles right up to the shower base, leaving a small gap. Fill this gap with flexible grout sealant rather than regular grout. This flexible material accommodates the tiny movements that naturally occur between different surfaces, preventing cracks that could become leak paths.
Getting these finishing details right is what transforms a functional shower into one of those transformative shower remodeling ideas that adds real value to your home. The extra time spent on proper waterproofing and finishing pays dividends in both appearance and longevity.
Common Mistakes to Avoid
Even with the best intentions, DIY projects can sometimes go awry. We've seen our share of issues, and many common shower pan installation mistakes are entirely preventable. By being aware of these pitfalls, you can ensure a smooth, leak-free installation.

Here are the top mistakes to avoid:
- Improper Leveling: This is perhaps the most critical error. An unlevel shower pan will lead to standing water, poor drainage, and eventually, mold and mildew. It can also cause stress on the pan itself, leading to cracks. Level the base in four directions: side-to-side (front and back) and front-to-back (right and left).
- Inadequate Subfloor Preparation: Rushing this step is a recipe for disaster. Failing to clean, level, or properly support the subfloor can result in a wobbly pan, poor adhesion, or structural issues down the line. Always countersink all nails and screws.
- Incorrect Mortar Mix or Application: Using the wrong type of mortar, mixing it to the wrong consistency, or applying it unevenly can lead to voids under the pan, causing it to flex and potentially crack. Ensure the mortar completely fills the pan ribs.
- Puncturing the Shower Pan Liner: The pan liner is your last line of defense against leaks. Carelessly dropping tools, stepping on sharp objects, or using staples/screws outside the recommended top ½ inch on the wall can compromise its integrity.
- Using the Wrong Sealant: As we mentioned, plumber's putty can degrade certain pan materials. Always use 100% silicone or the specific caulk recommended by the manufacturer for drain connections and sealing points.
- Over-Tightening Fittings: Whether it's the drain locking ring or screws securing the pan flange, over-tightening can crack the pan or strip threads, leading to leaks. Hand-tighten where specified, and use a light touch with power tools.
- Neglecting Expansion Gaps: Failing to leave the recommended 1/8" expansion gap between the pan and wall studs can cause the pan to buckle or crack due to material expansion and contraction.
- Skipping the Flood Test: This is your final verification of waterproofing. Don't assume everything is fine; always perform the flood test and allow water to sit for at least two hours to confirm watertightness.
By paying close attention to these details, you'll significantly increase your chances of a successful and long-lasting shower pan installation. For more insights into typical issues, check out Common Shower Problems Homeowners Face.
Frequently Asked Questions about Shower Pan Installation
When homeowners tackle shower pan installation, we hear the same questions over and over. These are perfectly normal concerns - after all, nobody wants to deal with water damage from a botched installation! Let's clear up the most common confusion points.
What's the difference between a shower pan and a shower base?
Here's something that trips up a lot of folks: the terms "shower pan" and "shower base" get tossed around like they mean completely different things, when really, they're more like cousins than strangers.
Technically speaking, a shower pan (sometimes called a shower tray) is the actual floor piece you stand on - that pre-formed unit that catches all the water and directs it toward the drain. A shower base, on the other hand, traditionally refers to the entire foundation system underneath, including the mortar bed and structural support.
But here's the thing: in the real world, most people - including many professionals - use these terms interchangeably. When you walk into a home improvement store and ask for a "shower base," they'll show you the same pre-manufactured units as if you'd asked for a "shower pan."
Both are integral parts of your shower floor system, working together to keep water flowing where it should and not where it shouldn't. For our purposes in this guide, when we say either term, we're talking about that essential component that forms the foundation of a leak-free shower.
How long does a shower pan installation take?
The timeline for shower pan installation depends heavily on whether you're rolling up your sleeves for a DIY weekend project or calling in the pros.
For DIY enthusiasts, plan on 3 to 4 days from start to finish. Now, before you panic about taking nearly a week off work, much of this time involves waiting for materials to cure properly. You might spend a few hours preparing the subfloor on day one, let your self-leveling compound cure overnight, then tackle the actual pan installation on day two.
The mortar bed needs time to set up properly - rushing this step is asking for trouble later. Day three might involve waterproofing and testing, with final touches on day four. It's not four days of non-stop work, but rather careful, methodical progress with proper drying times.
Professional installation moves much faster. Experienced installers can typically complete the job within a day or two of actual work time. They have the right tools, know all the tricks, and can work efficiently while still respecting those crucial curing times. Plus, they're not stopping to double-check instructions every few steps!
Can I install a shower pan on a concrete slab?
Absolutely! Installing a shower pan on a concrete slab follows very similar principles to installation on a wood subfloor, with just a few concrete-specific considerations to keep in mind.
The preparation process remains your most critical step. That concrete slab needs to be clean, dry, and perfectly level - just like wood subfloor preparation. Any cracks should be patched with appropriate concrete repair compound, and significant unevenness needs addressing with self-leveling compound.
One key difference is the moisture barrier consideration. While concrete won't rot like wood, it can still transmit moisture over time. Make sure your slab is completely dry before starting, and follow your shower pan manufacturer's recommendations for any additional moisture barriers.
For adhesion, you'll use modified thin-set mortar specifically designed for concrete bonding. The application technique is the same - spread it evenly and press that pan firmly into place. The drain connection process remains identical to wood subfloor installations, ensuring that watertight seal with your waste pipe.
Whether you're working with wood or concrete, the fundamentals stay the same: proper preparation, careful leveling, and attention to sealing details. These principles apply across different construction scenarios, as outlined in our guide to Plumbbing Installation Factors for New Construction Projects.
Conclusion: When to Call a Professional
There's something deeply satisfying about stepping into a shower you built with your own hands. Shower pan installation is one of those projects that can give you a real sense of accomplishment - plus, you'll have learned valuable skills that'll serve you well in future home improvement trips.
Throughout this guide, we've walked you through every critical step, from preparing that all-important subfloor to achieving perfect drainage with precise leveling. We've shared the tools you'll need, the common pitfalls to avoid, and the waterproofing techniques that separate a good installation from a great one.
But here's the thing - we also know that not every project is right for every person. Shower pan installation demands patience, precision, and a comfort level with both plumbing and carpentry work. One small mistake in leveling, sealing, or drain connection can lead to expensive water damage, mold problems, and the kind of repairs that make your wallet weep.
Maybe you've read through this guide and thought, "I've got this!" That's fantastic - go for it! But if you're feeling overwhelmed by the technical details, short on time, or simply prefer the peace of mind that comes with professional expertise, that's perfectly okay too.
At HRI Plumbing, we've seen it all when it comes to shower installations. Our experienced team knows exactly how to steer the tricky spots - like achieving that perfect level in all directions, ensuring proper drain alignment, and creating waterproof seals that'll last for decades. We follow industry best practices and use quality materials, so you can trust that your shower will be built right the first time.
Whether you're tackling this as a DIY challenge or seeking professional help, the goal is the same: a beautiful, leak-free shower that you can enjoy for years to come. If you decide you'd like expert assistance, we're here to help with your bathroom remodeling project in Rochester, IL - and we'll make sure it's done right.


